
How to Configure JumpServer OIDC SSO with Microsoft Azure Entra ID

Single sign-on (SSO) lets your team access JumpServer with the same corporate credentials they already use in Microsoft 365. By integrating JumpServer with Microsoft Azure Entra ID (formerly Azure Active Directory) through OpenID Connect (OIDC), you centralize authentication, reduce password sprawl, and align privileged access management with your existing identity governance.
This tutorial walks you through the complete setup: registering an application in Entra ID, collecting the required OIDC endpoints, and configuring JumpServer to authenticate users via Azure SSO.
What You Will Learn
- How to register a JumpServer application in Microsoft Entra ID
- How to obtain the Client ID, Client Secret, and OIDC endpoint URLs
- How to enable and configure OIDC authentication in JumpServer
- How to verify Azure Entra ID SSO login end to end
Prerequisites
Before you begin, make sure you have:
- A JumpServer instance (Community or Enterprise Edition) reachable over HTTPS
- An Azure subscription with permissions to create app registrations in Microsoft Entra ID
- The public base URL of your JumpServer deployment (for example,
https://jump.example.com/) - Administrator access to JumpServer System settings → Authentication
Important: The JumpServer redirect URI must use HTTPS and follow this exact path pattern:
https://<your-jumpserver-domain>/core/auth/openid/callback/
Part 1: Configure Microsoft Entra ID (Azure Portal)
All identity-provider configuration happens in the Azure portal under Microsoft Entra ID.
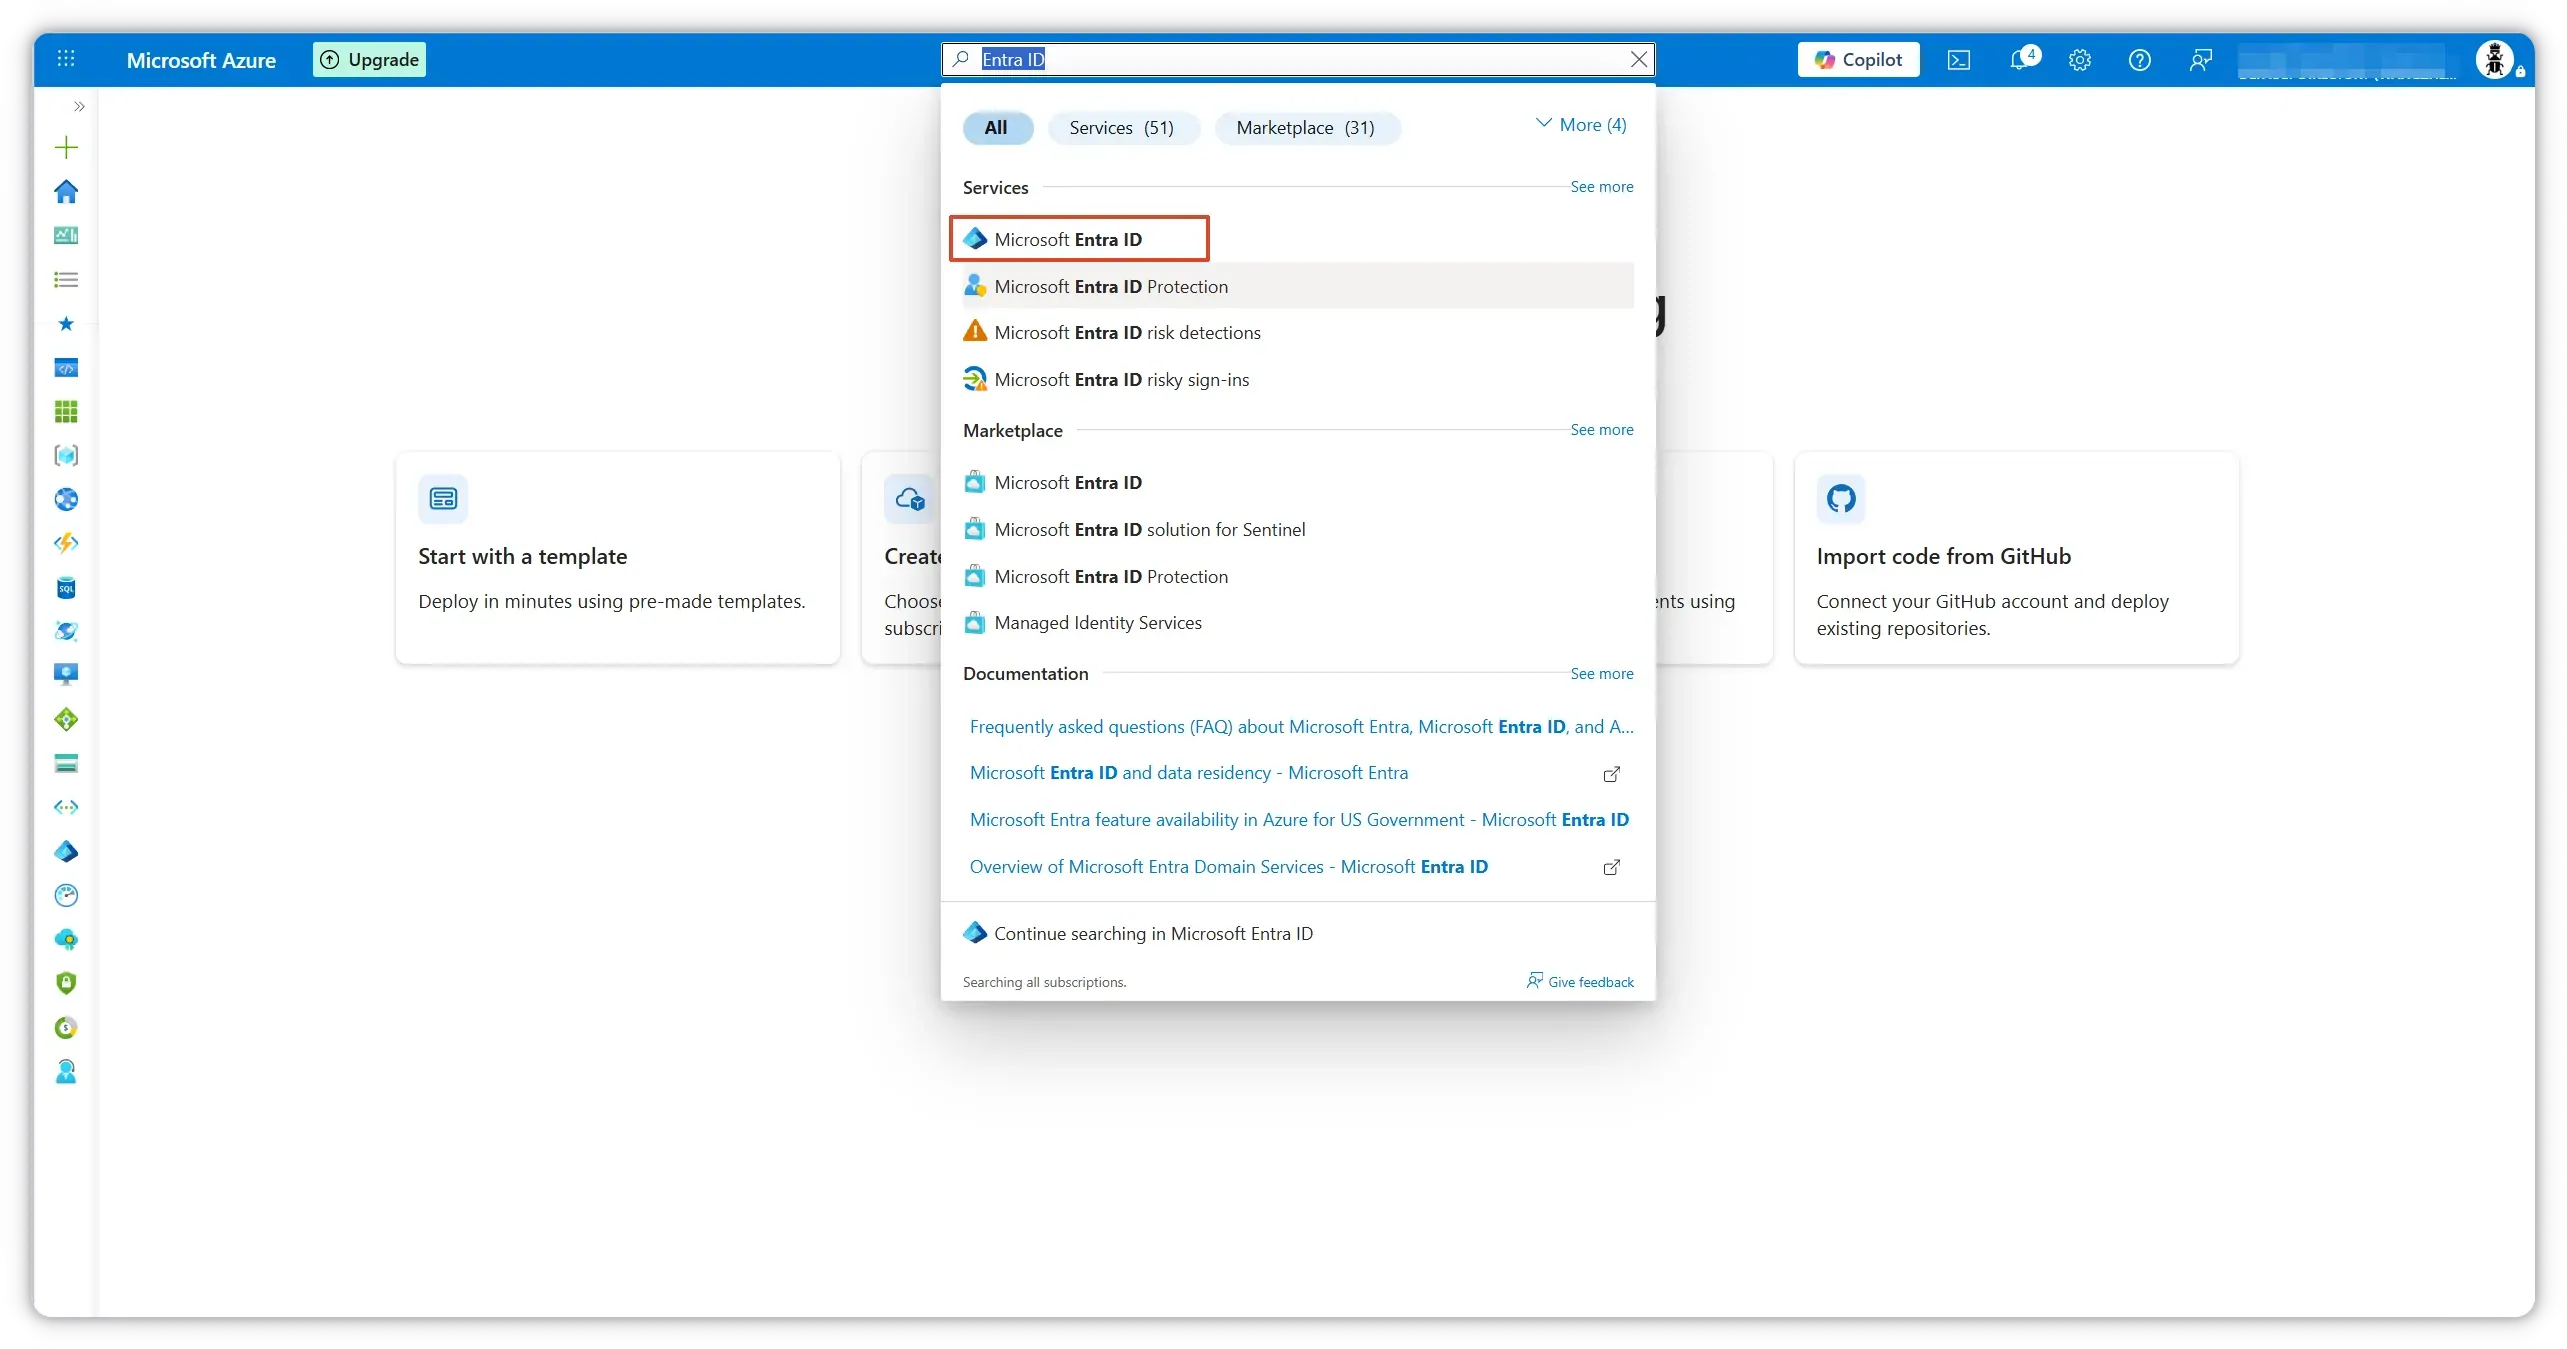
Step 1: Open Microsoft Entra ID
Sign in to the Azure portal. In the top search bar, type Entra ID and select Microsoft Entra ID from the results.
Step 2: Register a New Application
From the Entra ID overview page, click + Add and choose App registration.
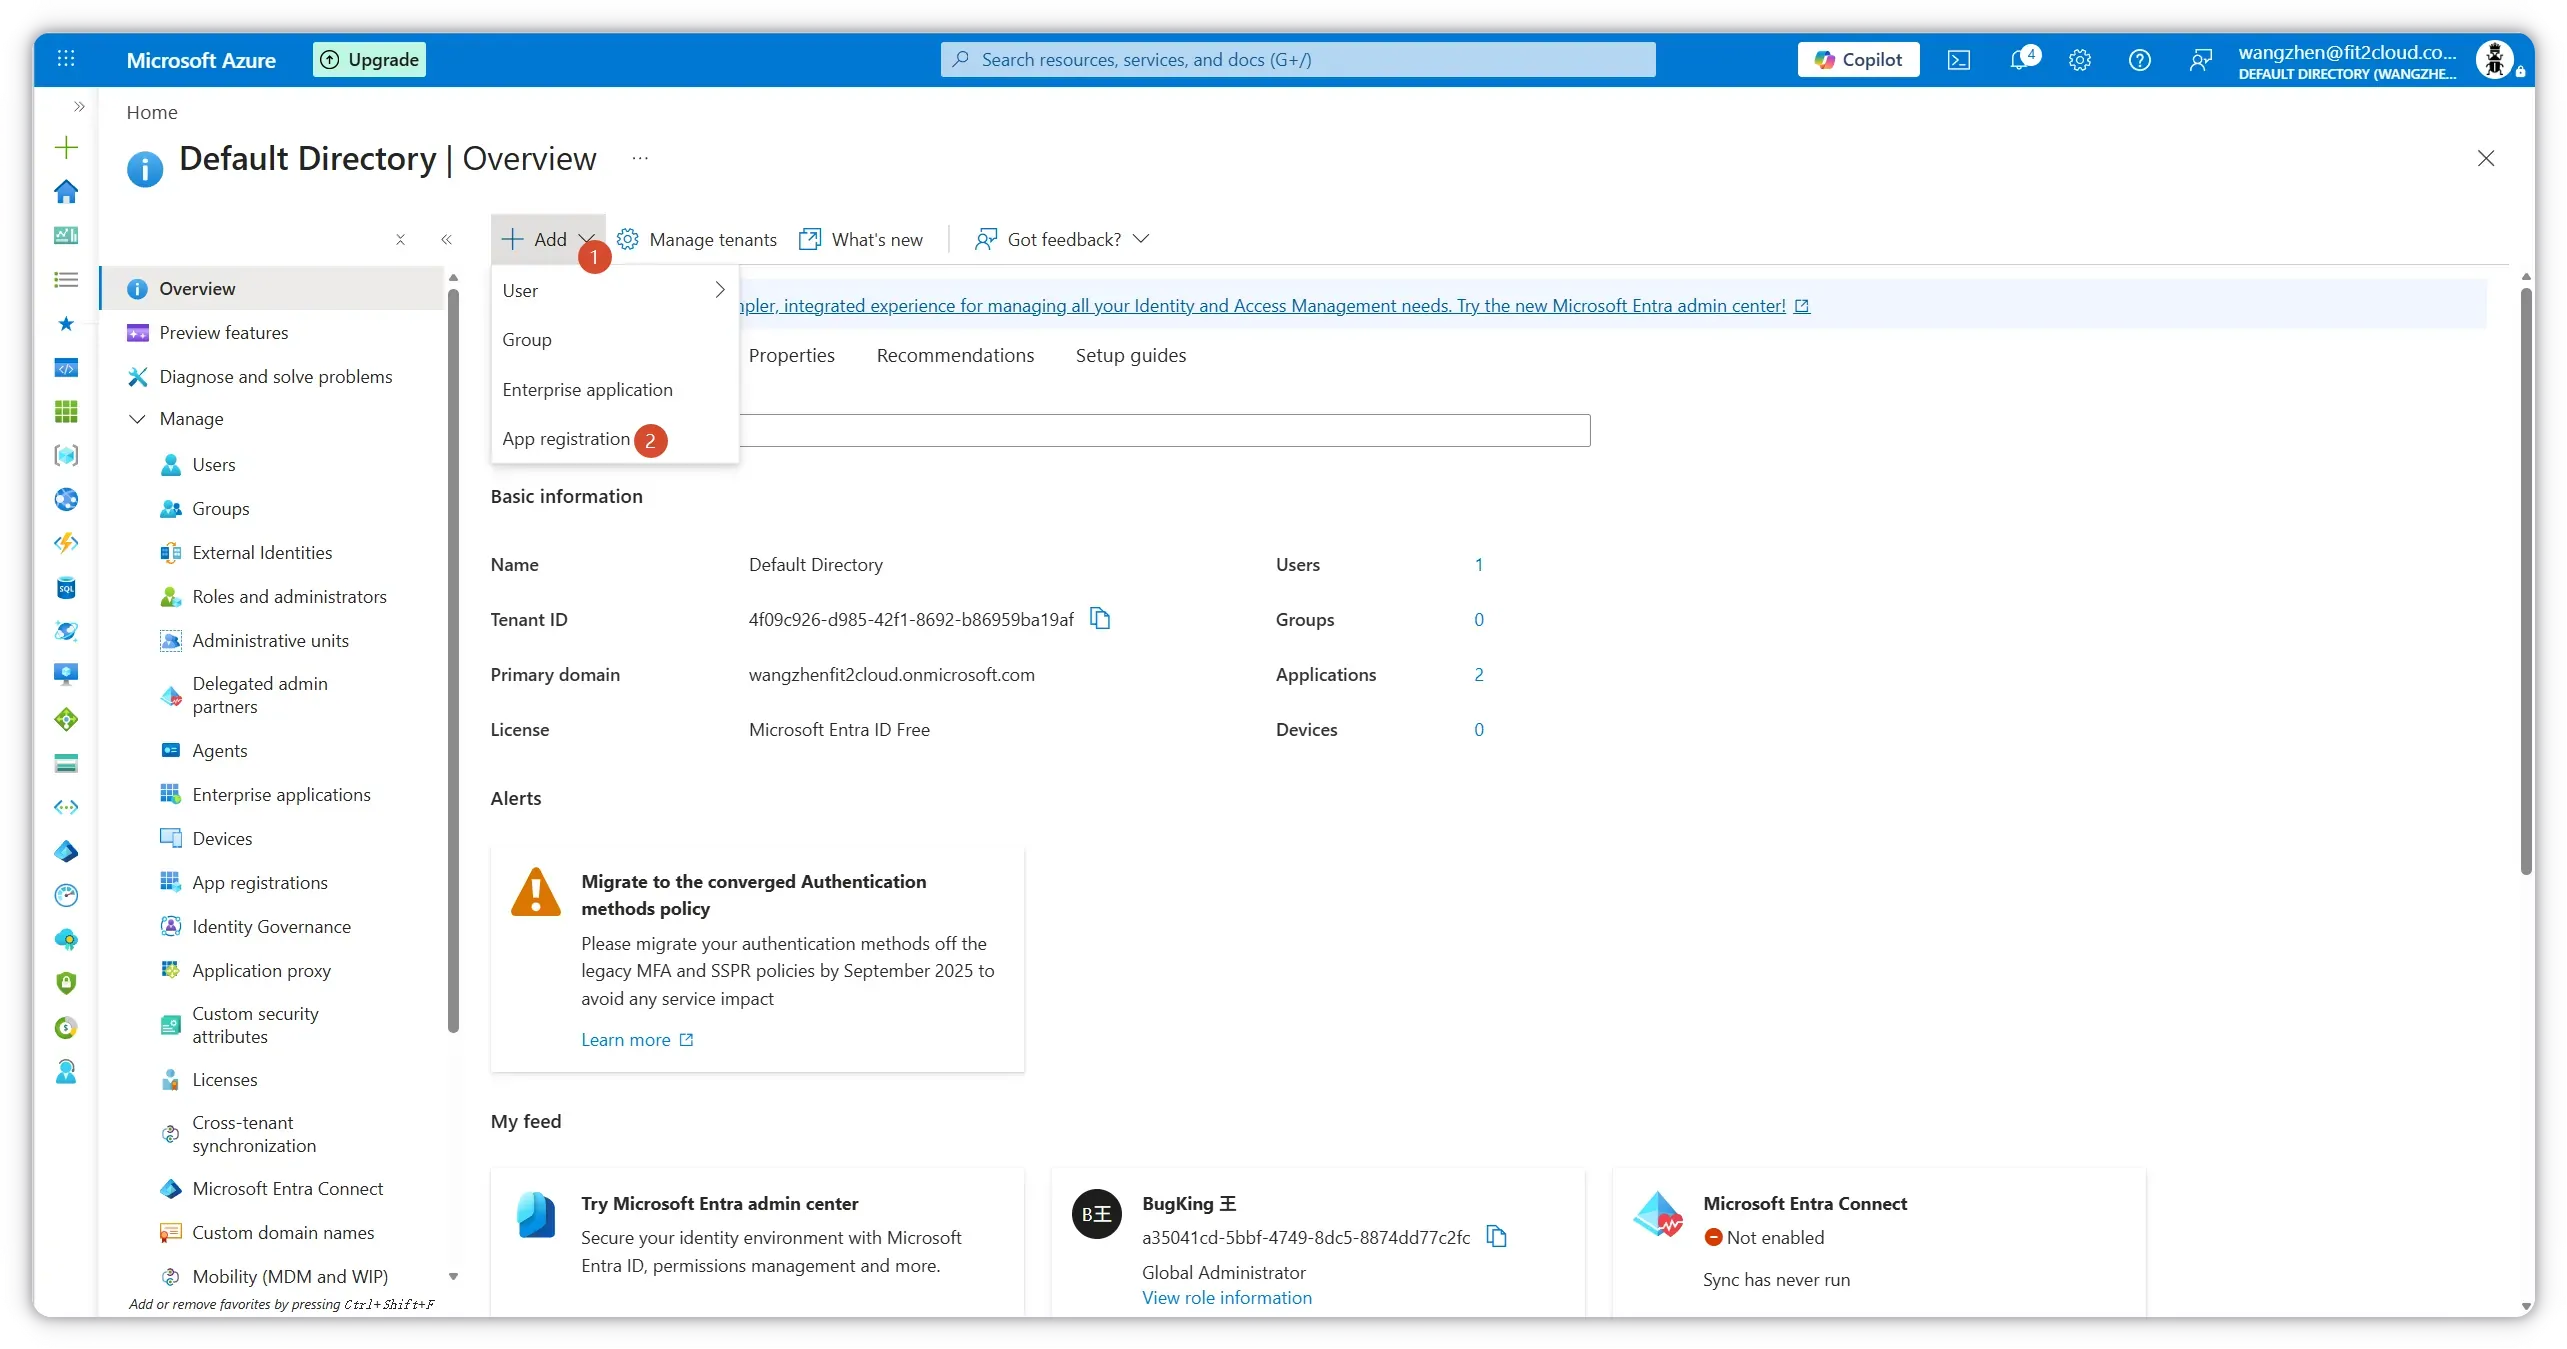
On the Register an application page, configure the following:
| Field | Value |
|---|---|
| Name | JumpServer (or any descriptive name) |
| Supported account types | Accounts in this organizational directory only (single tenant) |
| Redirect URI — Platform | Web |
| Redirect URI — URL | https://<your-jumpserver-domain>/core/auth/openid/callback/ |
Replace <your-jumpserver-domain> with your actual JumpServer hostname. The trailing slash is required.
Click Register to create the application.
Step 3: Copy the Application (Client) ID
After registration, Azure opens the application Overview page. Copy and save the Application (client) ID — you will enter this value as the Client ID in JumpServer.
You may also note the Directory (tenant) ID; it is used to build the OIDC endpoint URLs in the next step.
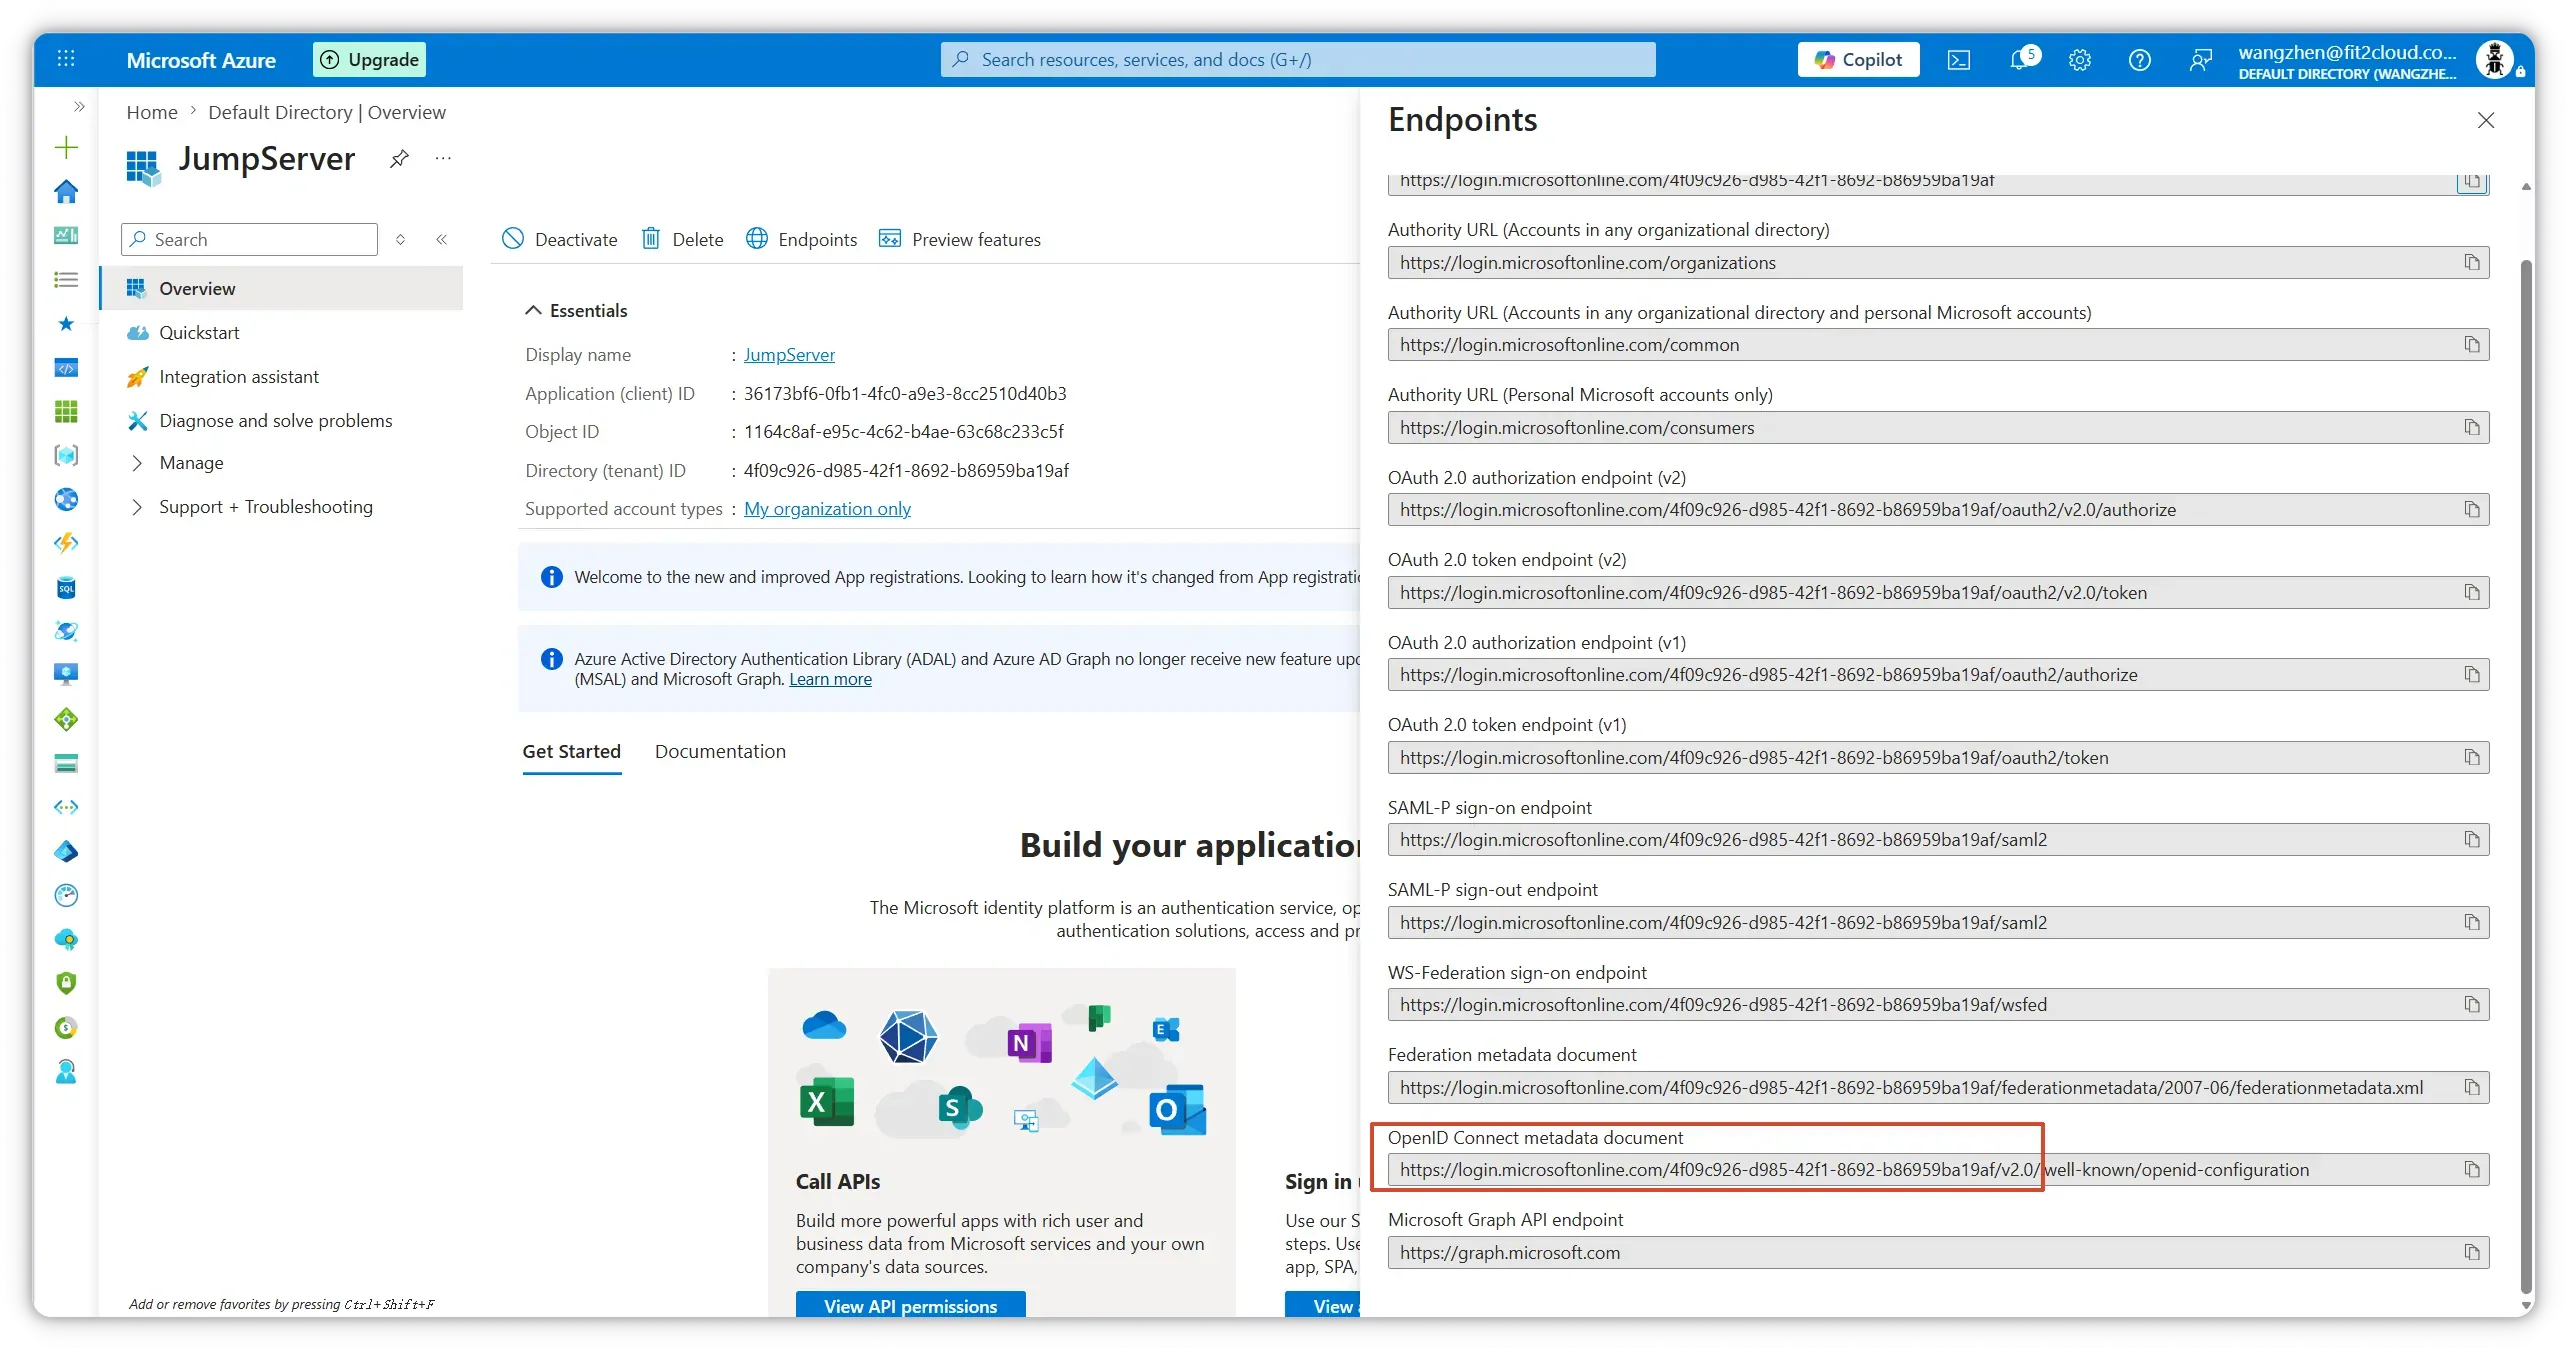
Step 4: Retrieve OIDC Endpoint URLs
On the same Overview page, click Endpoints in the top menu. A panel opens on the right listing all protocol endpoints.
- Locate OpenID Connect metadata document and copy its URL.
- Open that URL in a new browser tab. The JSON document lists all OIDC endpoints for your tenant.
From the metadata document (or the Endpoints panel), collect the following values for JumpServer:
| JumpServer Field | Azure Source |
|---|---|
| Provider endpoint | Issuer URL — https://login.microsoftonline.com/<tenant-id>/v2.0 |
| Authorization endpoint | https://login.microsoftonline.com/<tenant-id>/oauth2/v2.0/authorize |
| Token endpoint | https://login.microsoftonline.com/<tenant-id>/oauth2/v2.0/token |
| JWKS endpoint | https://login.microsoftonline.com/<tenant-id>/discovery/v2.0/keys |
| Userinfo endpoint | https://graph.microsoft.com/oidc/userinfo |
| End session endpoint | https://login.microsoftonline.com/<tenant-id>/oauth2/v2.0/logout |
Replace <tenant-id> with your Directory (tenant) ID.
Tip: Opening the metadata document in your browser is the easiest way to confirm every endpoint URL before pasting them into JumpServer.
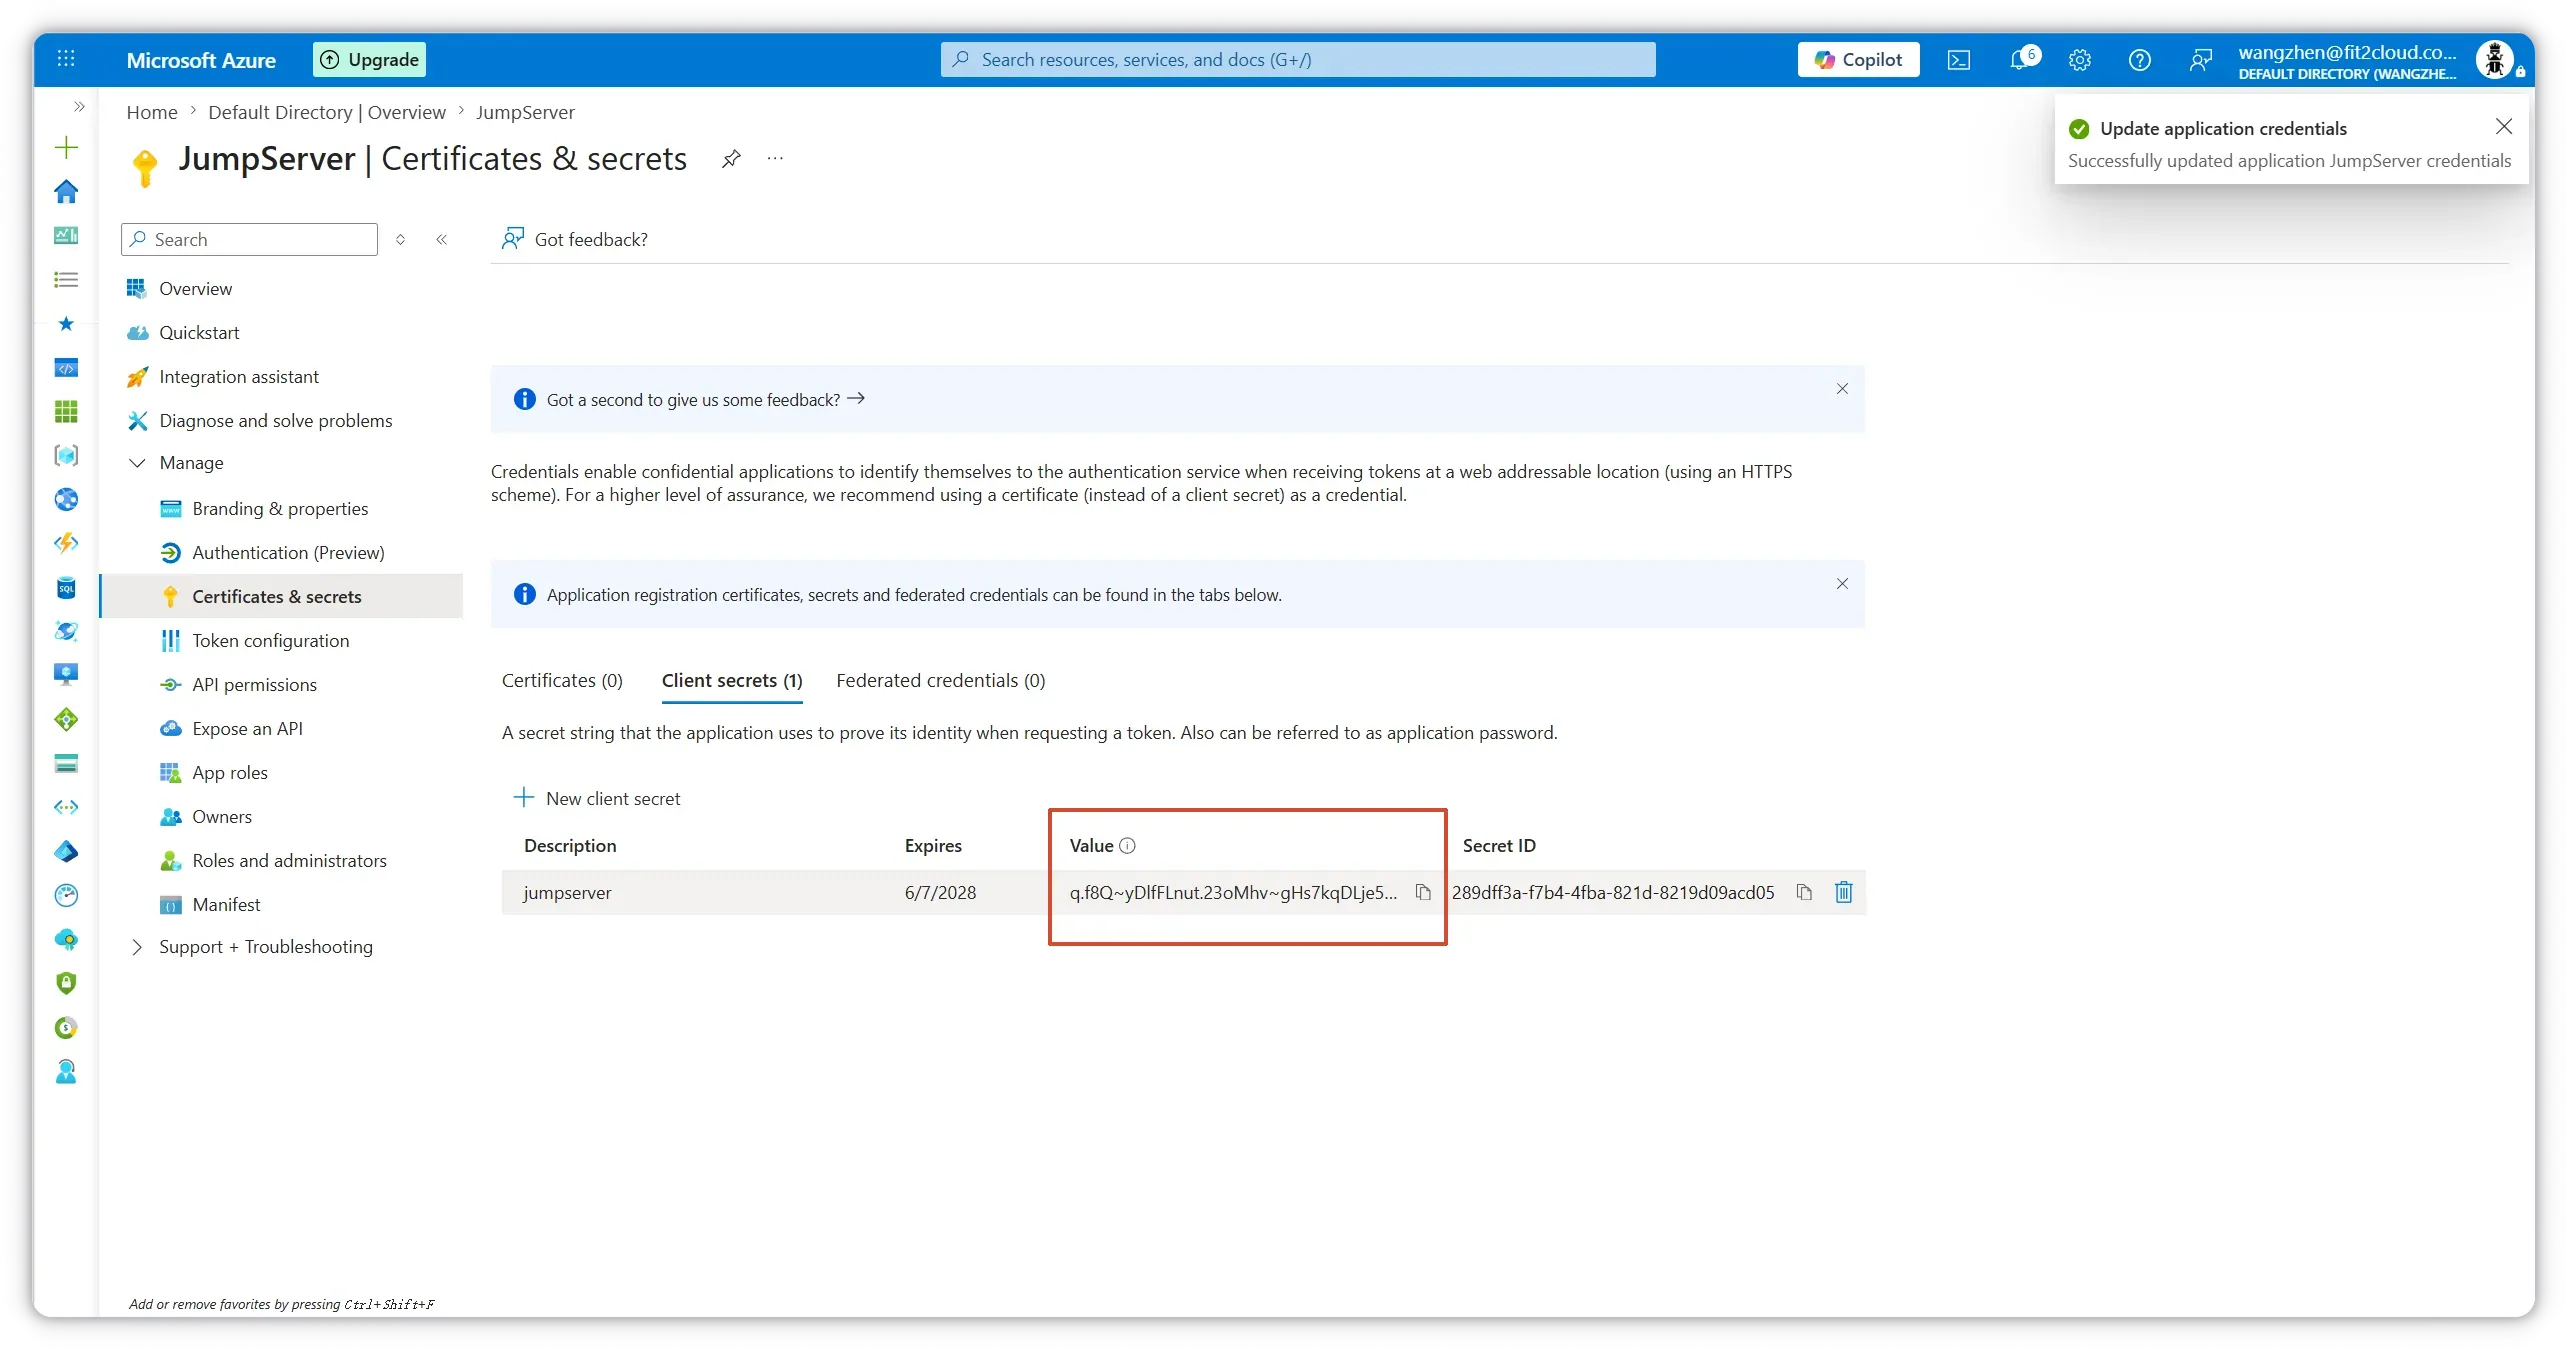
Step 5: Create a Client Secret
In the left navigation pane, go to Certificates & secrets. Open the Client secrets tab and click + New client secret.
- Enter a description (for example,
jumpserver). - Choose an expiration period (Microsoft recommends rotating secrets before they expire; 24 months is a common choice).
- Click Add.
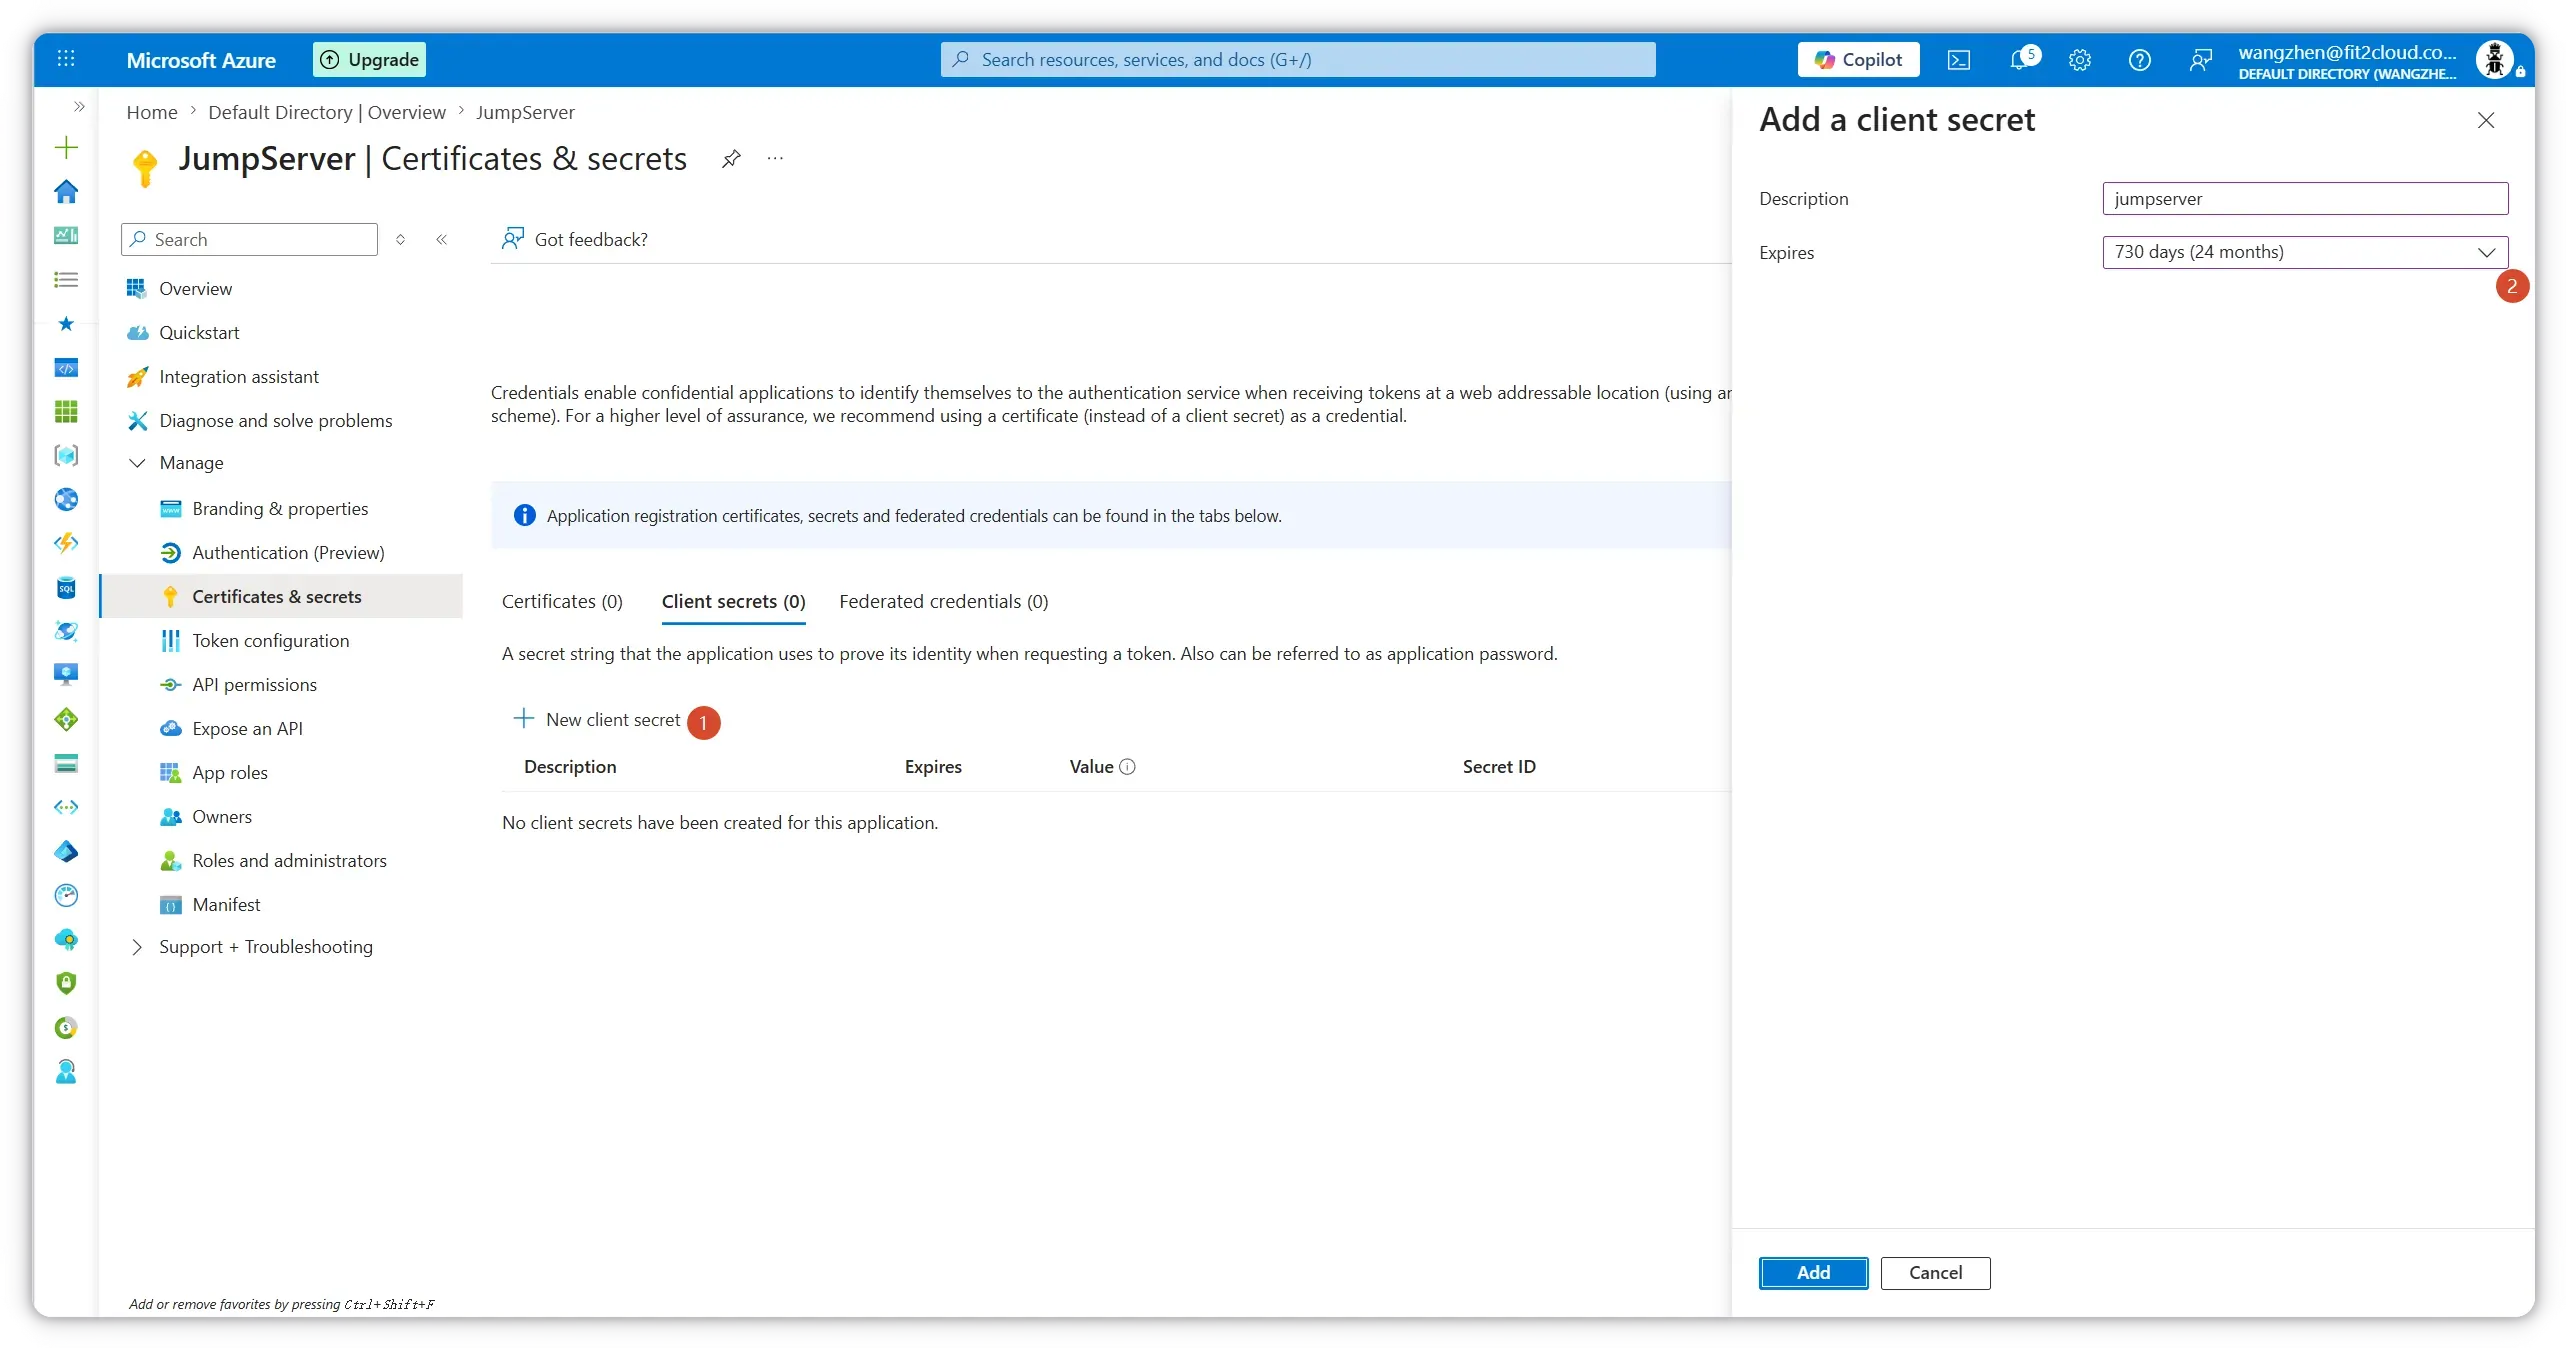
Azure displays the secret Value only once. Copy it immediately and store it in a secure location — you cannot retrieve it later.
Part 2: Configure JumpServer
With Entra ID configured, switch to the JumpServer administration console.
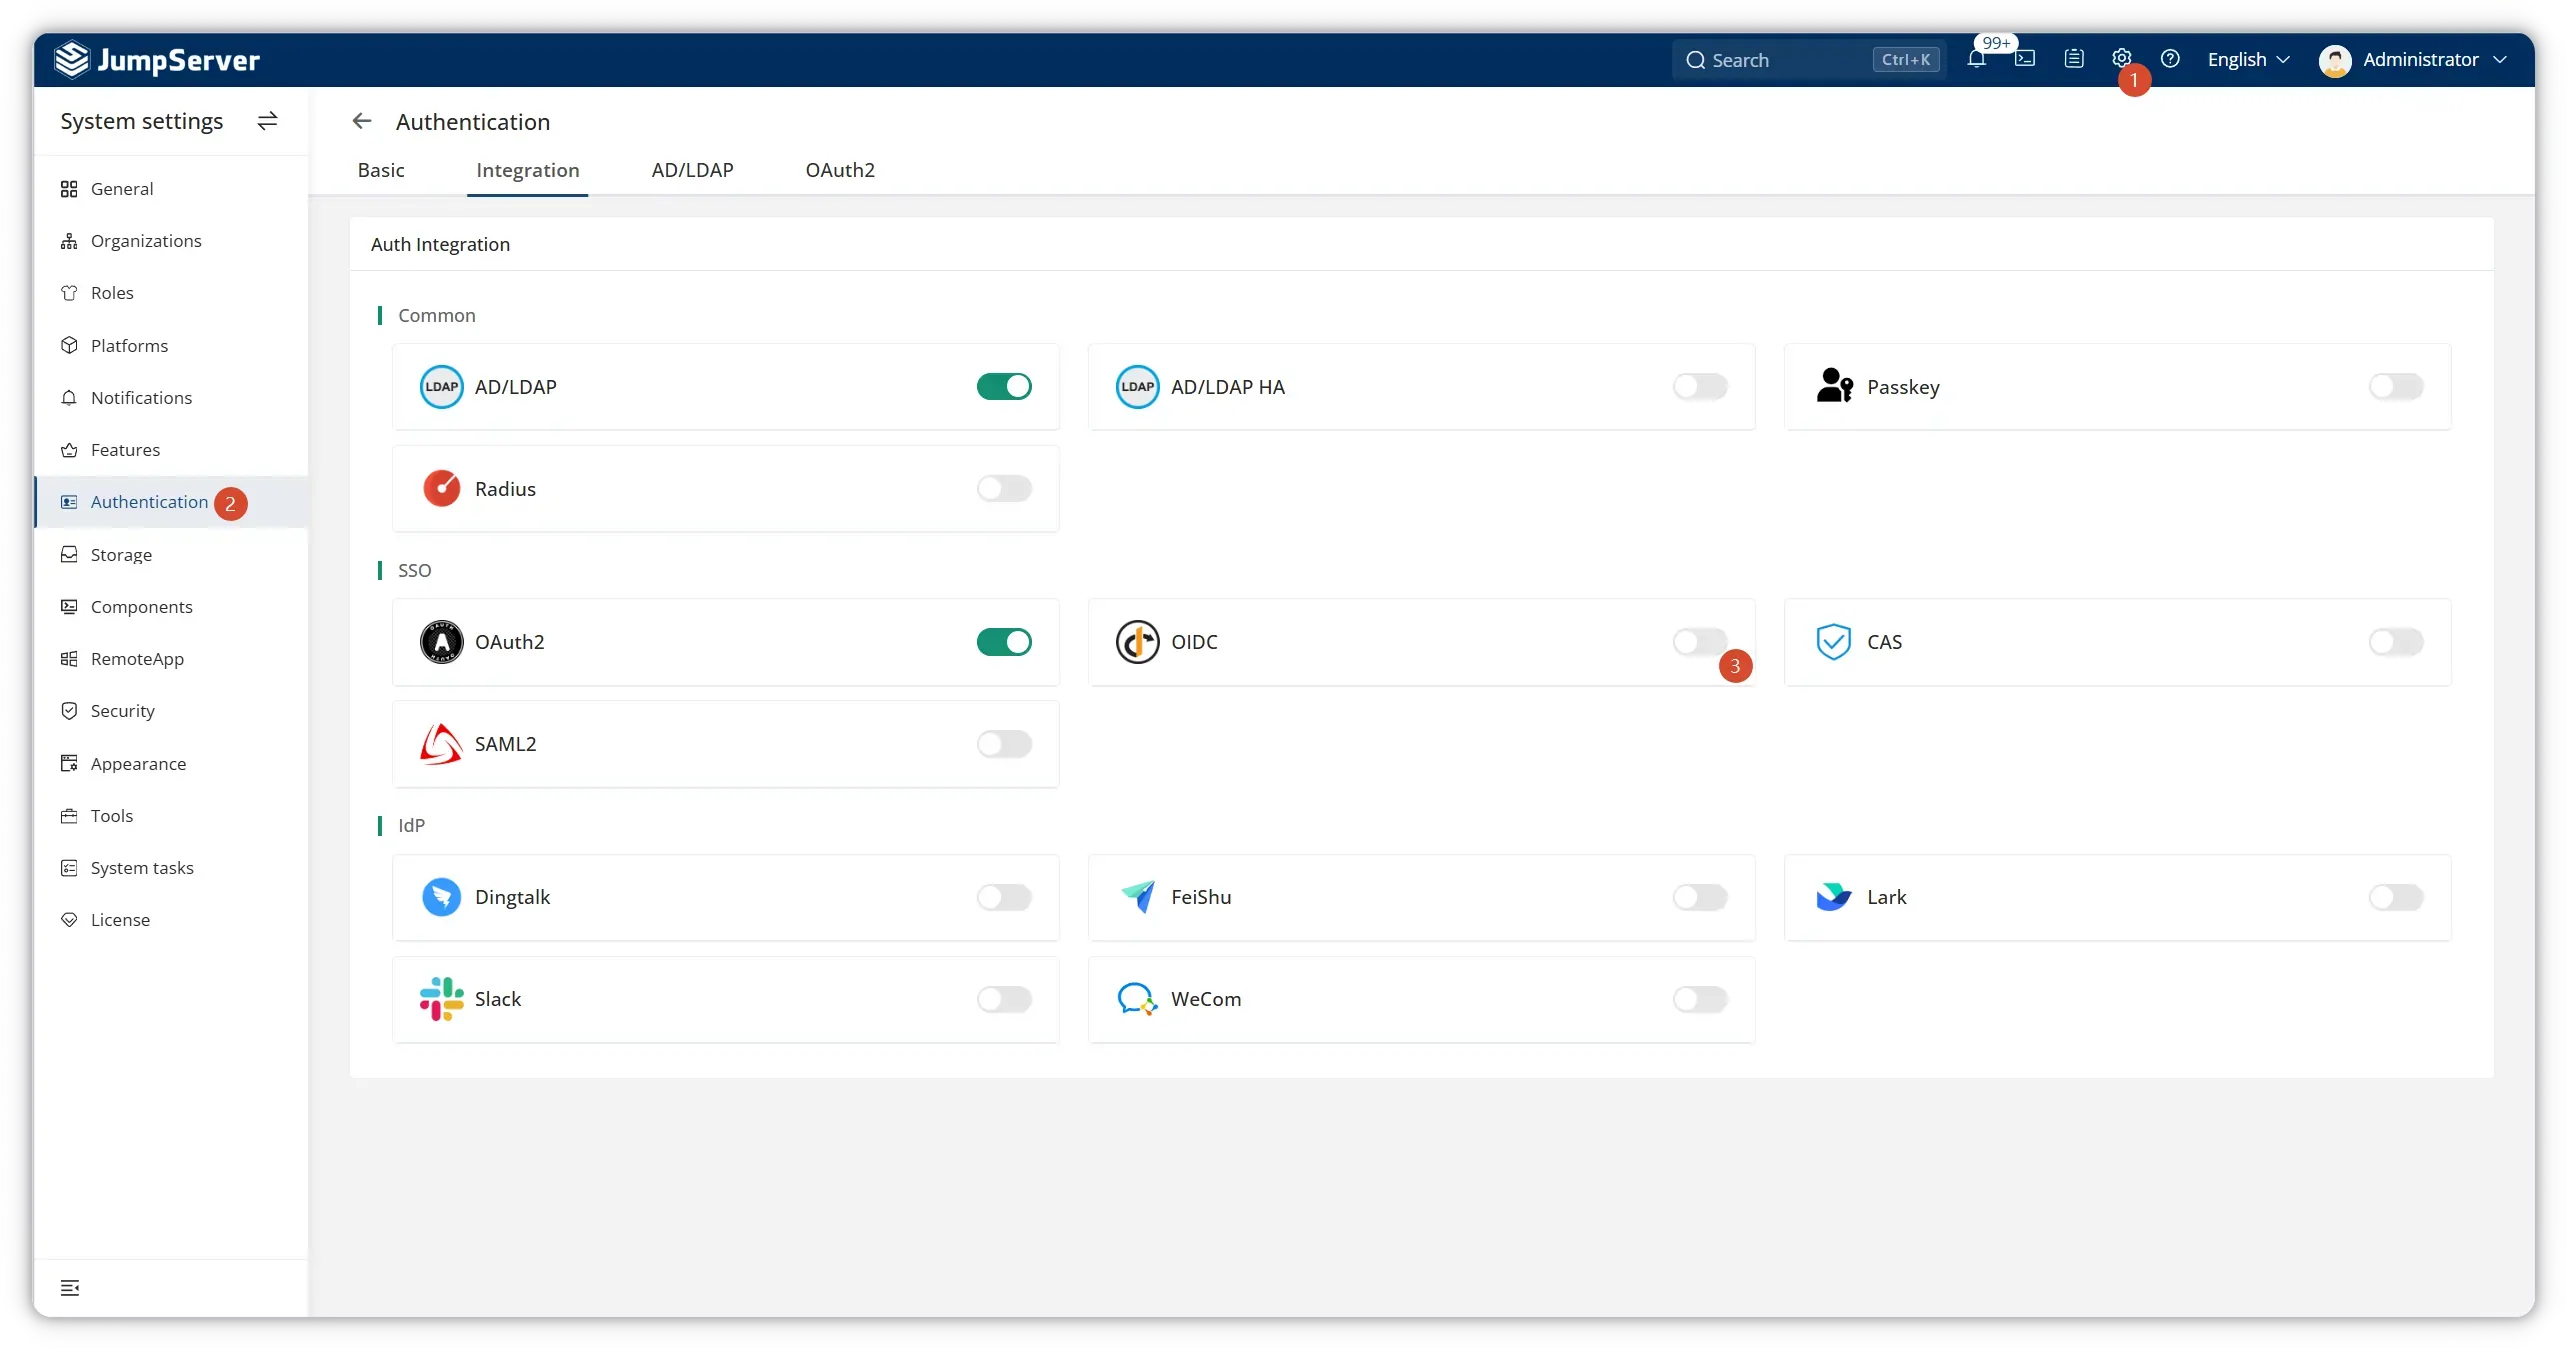
Step 6: Enable OIDC Authentication
- Click the Settings (gear) icon in the top-right corner.
- In the left sidebar, select Authentication.
- Open the Integration tab.
- Under SSO, toggle OIDC to ON.
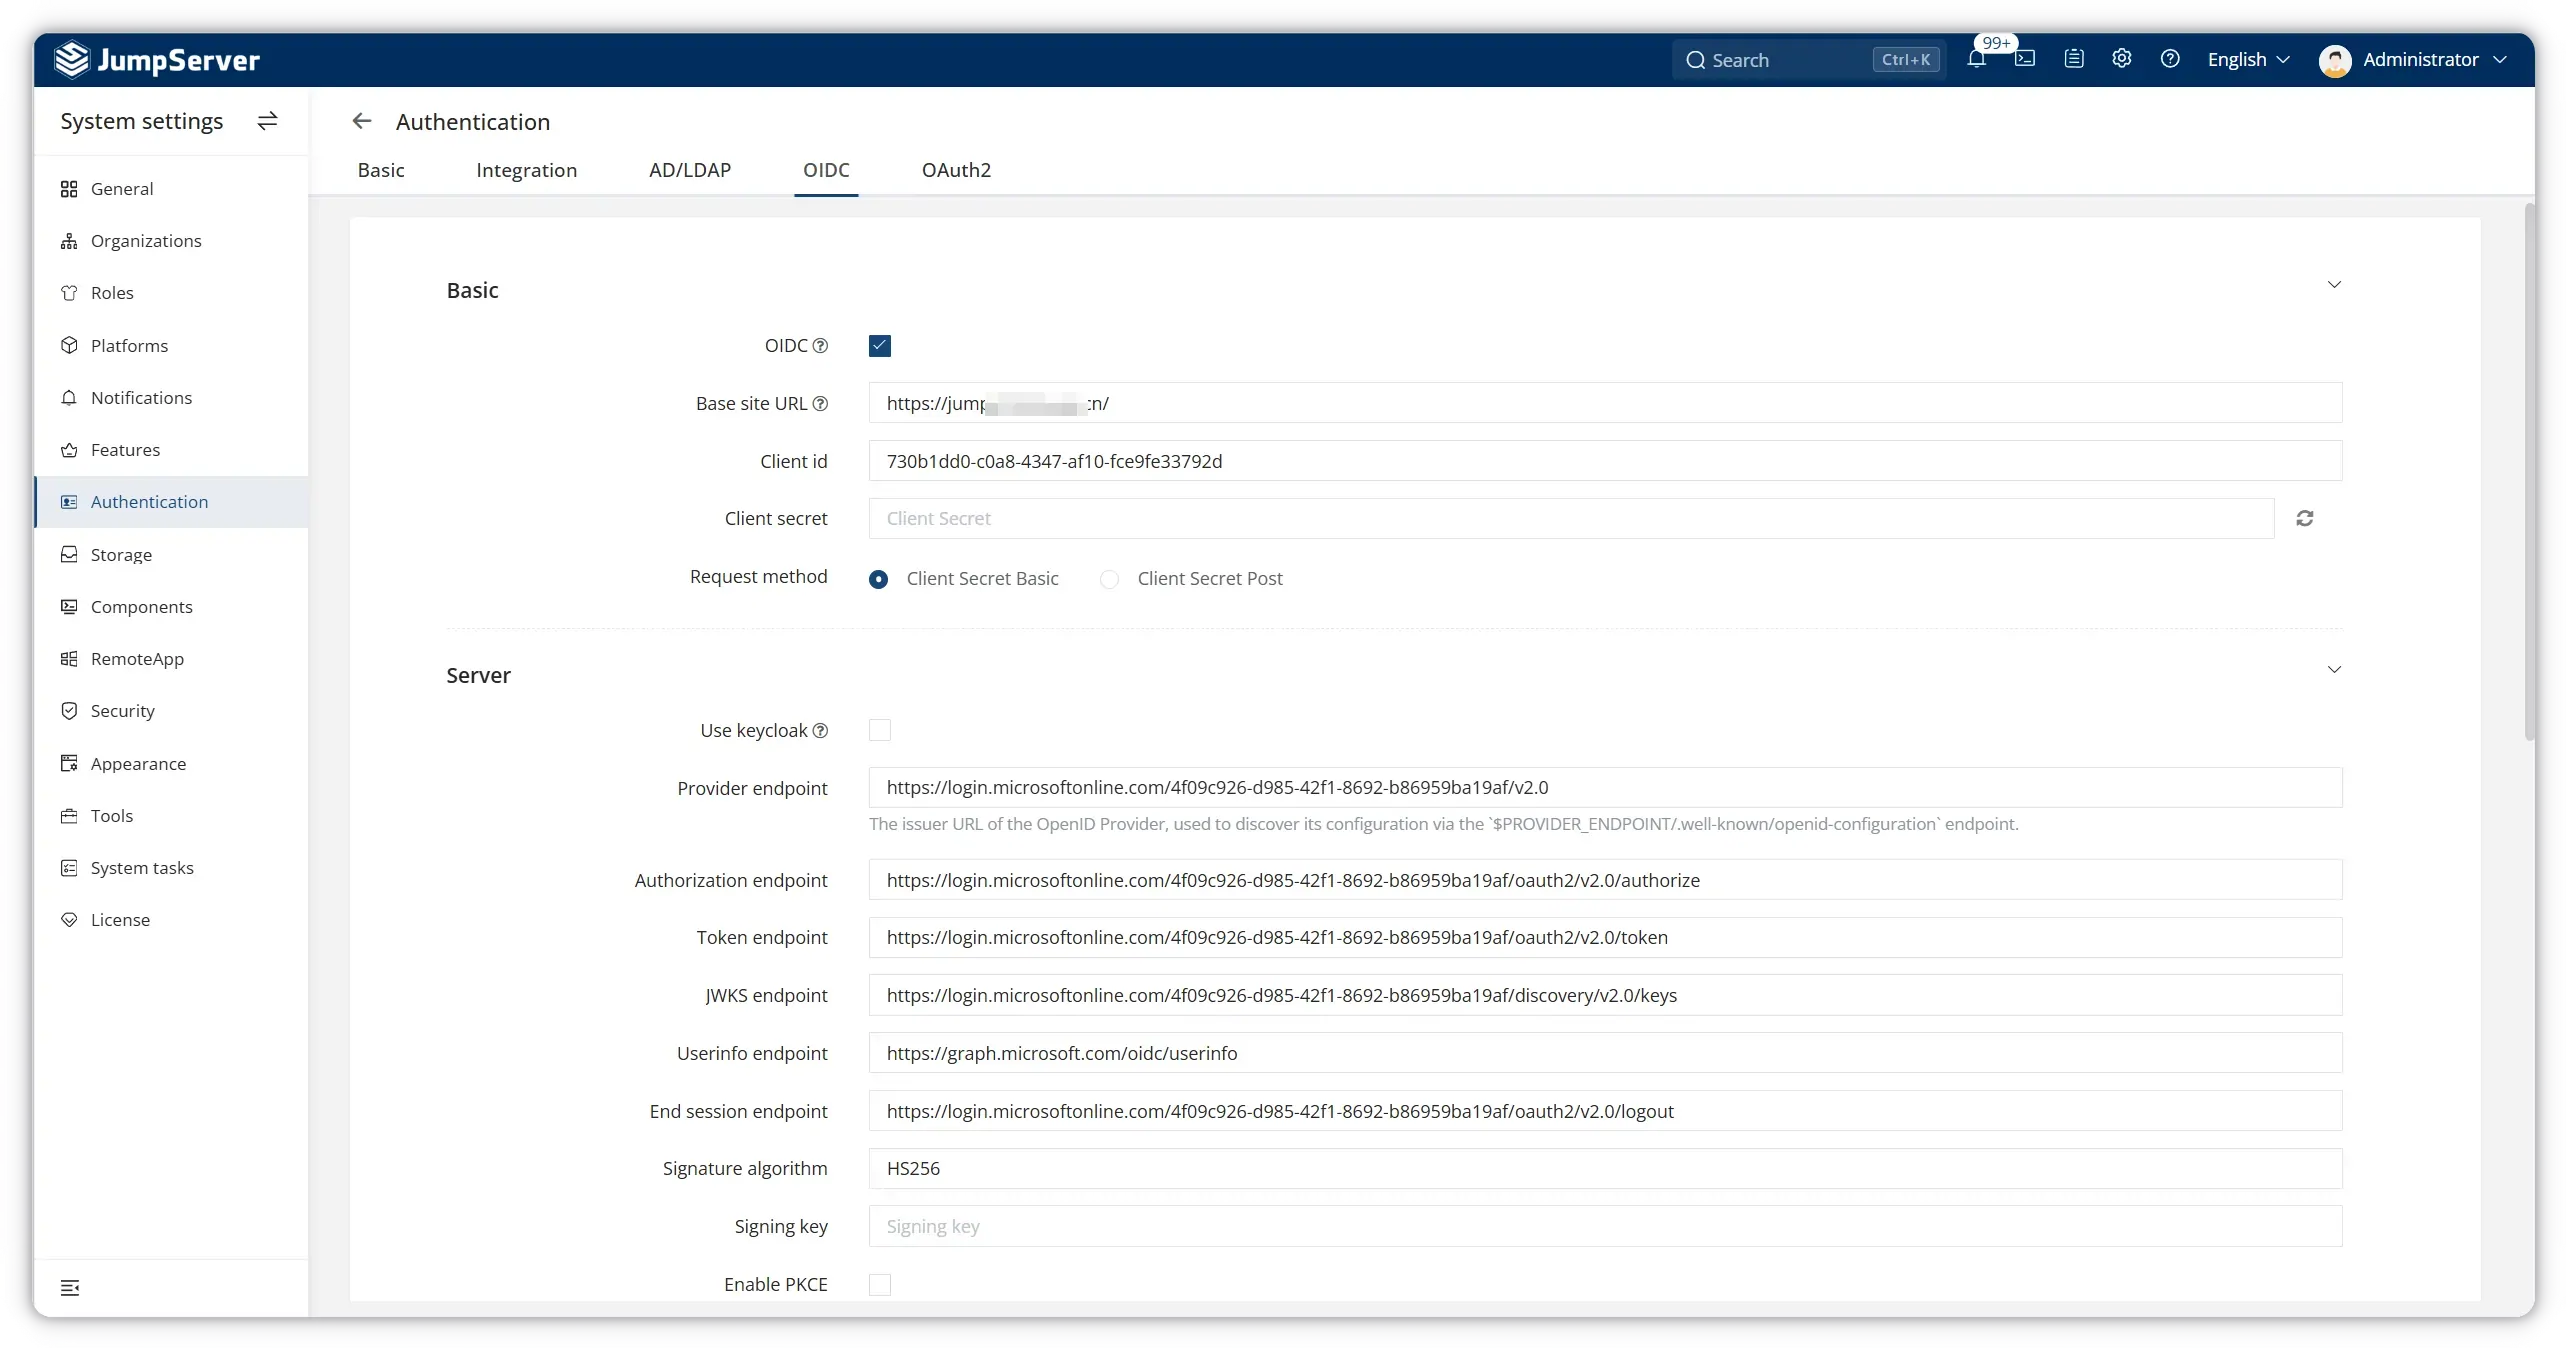
Step 7: Configure OIDC Parameters
Open the OIDC tab and fill in the settings below.
Basic Settings
| Field | Value |
|---|---|
| OIDC | Enabled |
| Base site URL | https://<your-jumpserver-domain>/ |
| Client ID | Application (client) ID from Step 3 |
| Client secret | Client secret value from Step 5 |
| Request method | Client Secret Basic |
Server Settings
Fill in the ‘Provider endpoint’ with the value from Step 4, and JumpServer will automatically fill in the other endpoints.
| Field | Value |
|---|---|
| Use Keycloak | Disabled |
| Provider endpoint | https://login.microsoftonline.com/<tenant-id>/v2.0 |
| Authorization endpoint | https://login.microsoftonline.com/<tenant-id>/oauth2/v2.0/authorize |
| Token endpoint | https://login.microsoftonline.com/<tenant-id>/oauth2/v2.0/token |
| JWKS endpoint | https://login.microsoftonline.com/<tenant-id>/discovery/v2.0/keys |
| Userinfo endpoint | https://graph.microsoft.com/oidc/userinfo |
| End session endpoint | https://login.microsoftonline.com/<tenant-id>/oauth2/v2.0/logout |
| Signature algorithm | HS256 |
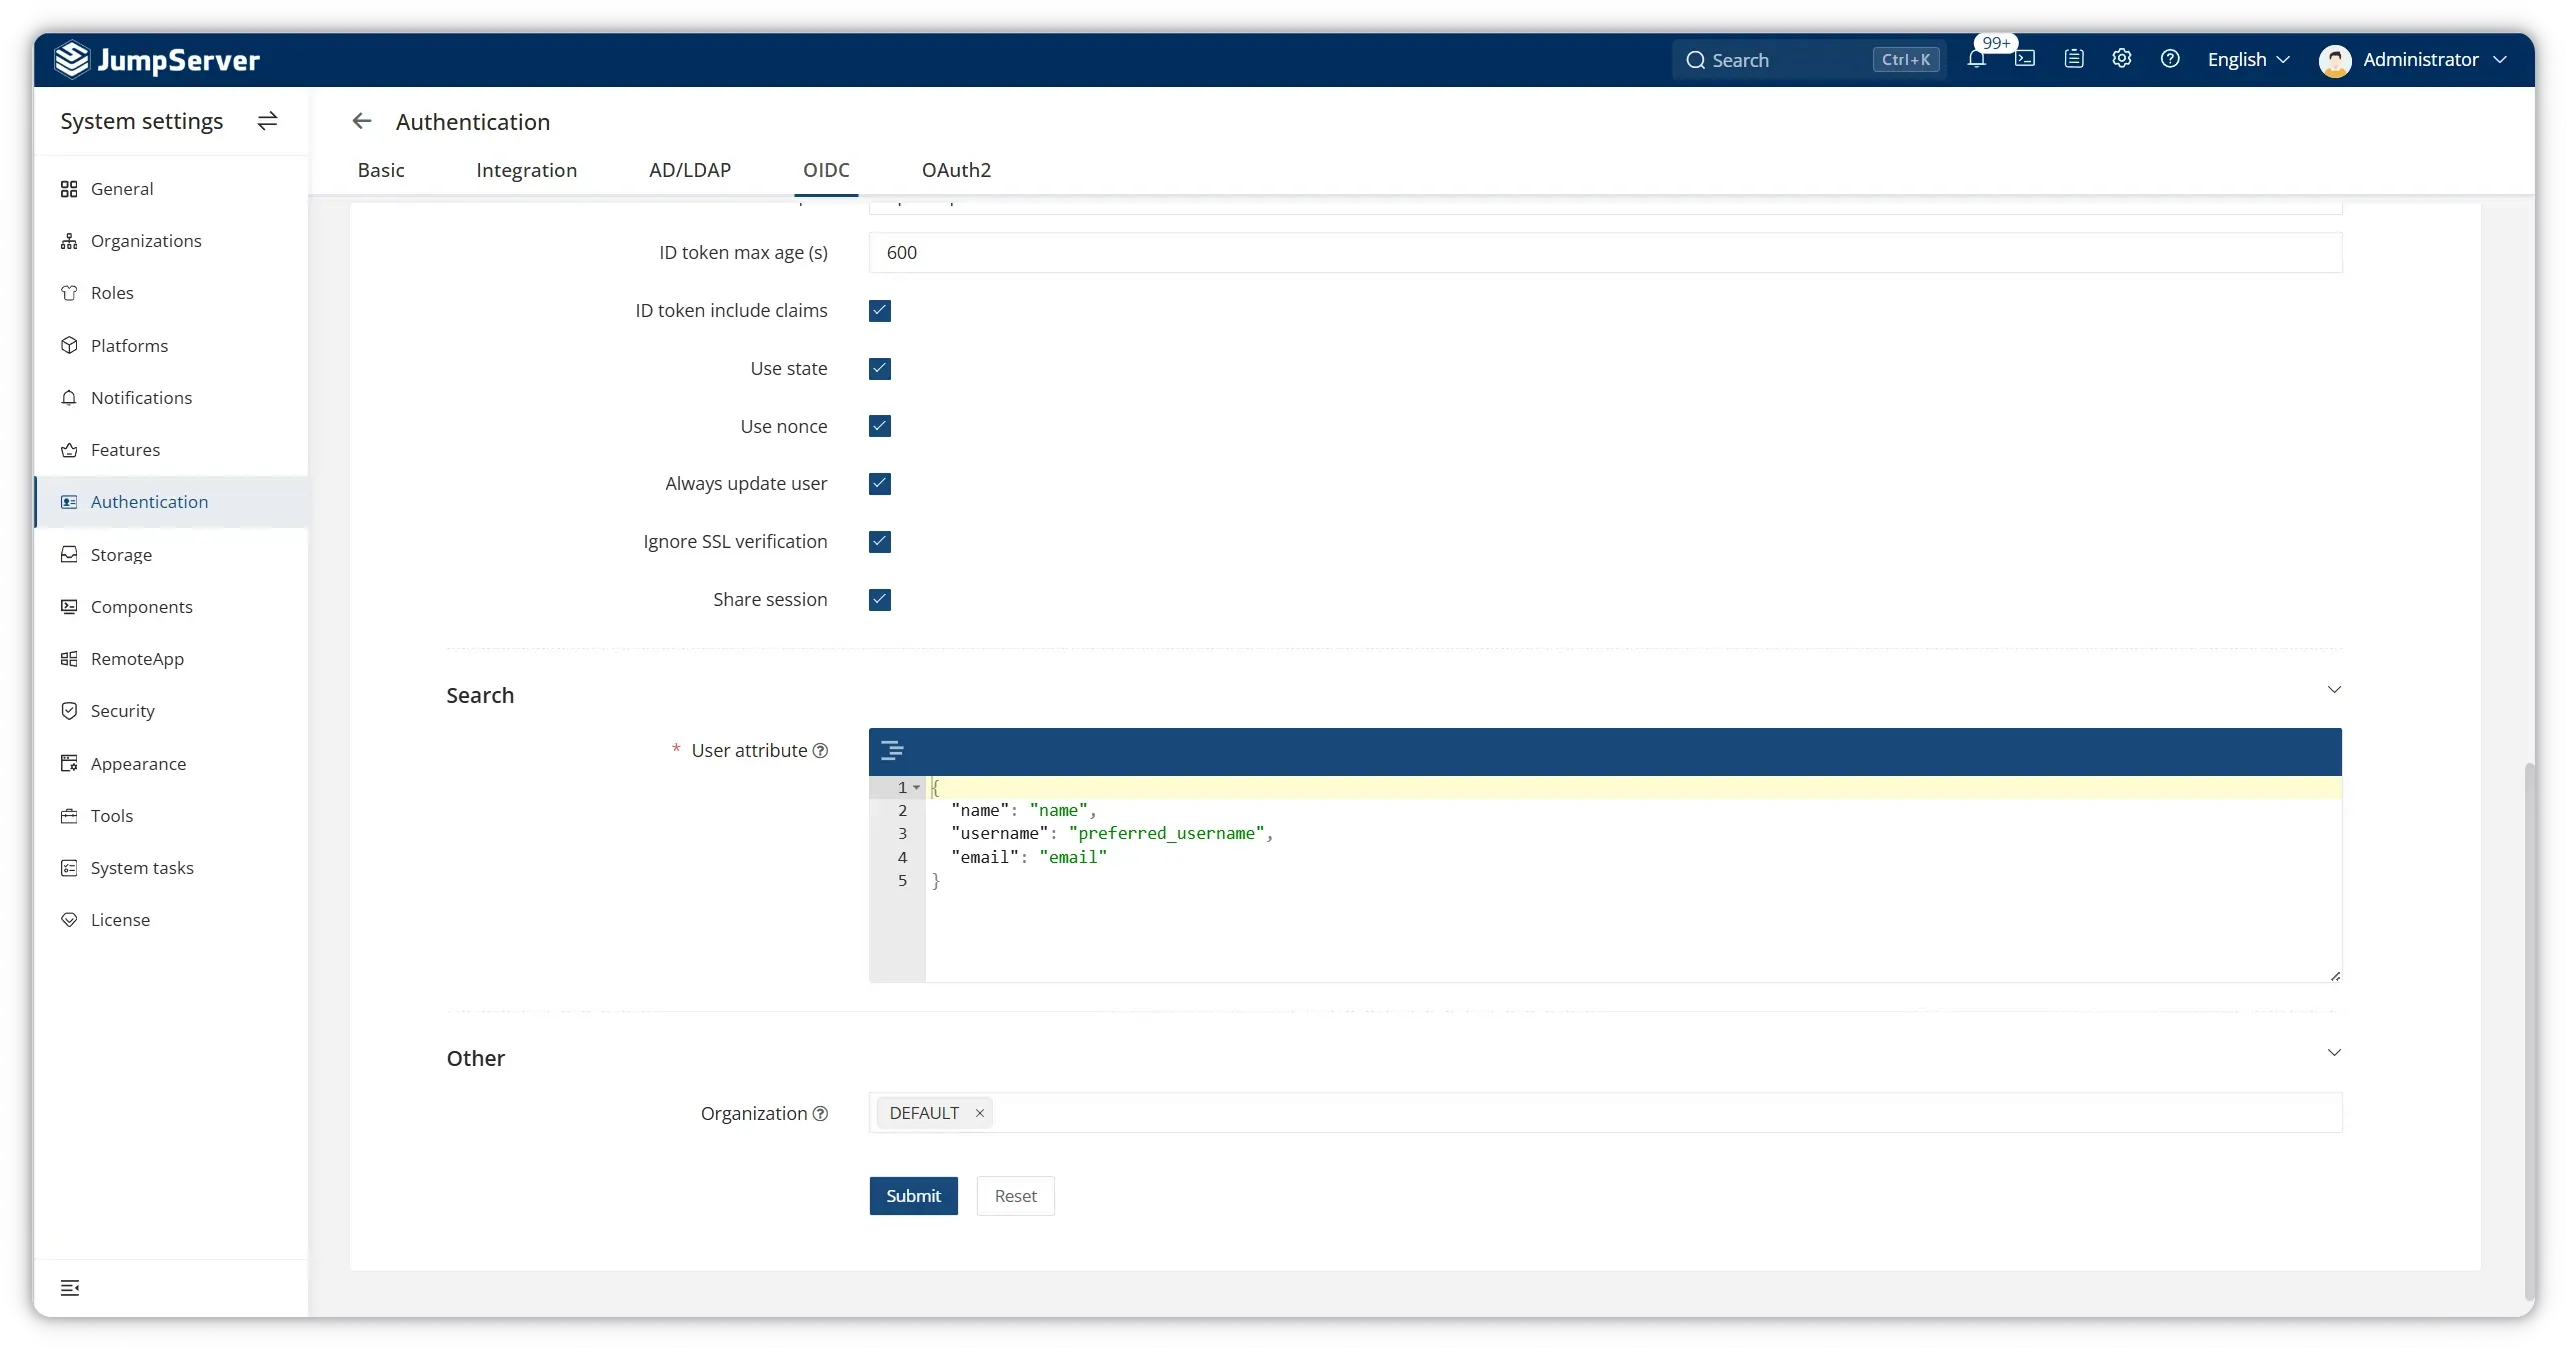
Token, Session, and User Mapping
Scroll down to configure token behavior and user attribute mapping:
| Field | Recommended Value |
|---|---|
| ID token max age (s) | 600 |
| ID token include claims | Enabled |
| Use state | Enabled |
| Use nonce | Enabled |
| Always update user | Enabled |
| Share session | Enabled |
In the User attribute JSON editor, map Azure Entra ID claims to JumpServer user fields:
{
  "name": "name",
  "username": "preferred_username",
  "email": "email"
}
Set Organization to the JumpServer organization where SSO users should be provisioned (typically DEFAULT).
Click Submit to save the configuration.
Step 8: Test SSO Login
- Log out of JumpServer (or open a private/incognito browser window).
- On the JumpServer login page, select the OIDC (or Azure / OpenID Connect) login option.
- You are redirected to the Microsoft sign-in page. Authenticate with an Entra ID account that is allowed to access the application.
- After successful authentication, Azure redirects back to JumpServer and provisions or updates the user based on your attribute mapping.
If login fails, verify the redirect URI, Client ID, Client Secret, and endpoint URLs match exactly between Entra ID and JumpServer.
Summary
Integrating JumpServer with Microsoft Azure Entra ID via OIDC gives your organization a secure, standards-based SSO experience for privileged access management. The setup involves two main phases:
- Azure Entra ID — Register the JumpServer application, configure the redirect URI, create a client secret, and collect OIDC endpoint URLs.
- JumpServer — Enable OIDC under Authentication settings, enter the Azure credentials and endpoints, map user attributes, and test login.
Once configured, users can sign in to JumpServer with their corporate Microsoft credentials, simplifying access control while keeping authentication centralized in Entra ID.
Troubleshooting
| Symptom | Likely Cause | Fix |
|---|---|---|
| Redirect URI mismatch error | Redirect URL in Azure does not match JumpServer | Ensure the URI is exactly https://<domain>/core/auth/openid/callback/ |
| Invalid client secret | Secret expired or copied incorrectly | Create a new client secret in Entra ID and update JumpServer |
| User not provisioned | Attribute mapping incorrect | Verify the preferred_username and email claims exist in the ID token |
| SSL / certificate errors | Self-signed or internal CA certificate | Install a trusted TLS certificate on JumpServer, or review SSL verification settings |
Related Topics
- JumpServer official documentation
- Microsoft Entra ID app registration documentation
- OpenID Connect specification overview
Have questions about JumpServer SSO integrations? Contact the JumpServer team or explore more integration guides on our blog.

.webp)