

Web Assets
A web asset is an asset created from the Website platform. It exposes an
http or https protocol and points at a web application, such as an internal
management console or a SaaS page. Users open web assets in two ways: in the
built-in browser of JumpServer Client, or in a published WebLite application from
the browser Web Terminal.
Script autofill, the Successful login selector and the Interactive selector, and web asset session recording require JumpServer Enterprise Edition. The Website asset type, Disabled and Basic autofill, and built-in browser access from JumpServer Client are included in Community Edition.
Overview
Web assets differ from most other asset types because the access path decides what carries the session. The two supported paths are:
The built-in browser is part of JumpServer Client. It does not use a RemoteApp relay, so this path needs no Windows Server and no RDS license, and built-in browser access is included in Community Edition. The WebLite path publishes the site as a remote application and follows the RemoteApp infrastructure described in RemoteApp.
Before you begin
- Sign in with an account that can manage assets in the Console.
- Plan the URL, the node, and the account before you create the asset. Autofill uses the account bound to the asset.
- For the built-in browser path, install JumpServer Client and make sure the
client can reach the JumpServer Web proxy on
5001/tcp. See Network Ports. - For the WebLite path, deploy at least one RemoteApp machine or VirtualApp provider and publish the WebLite application. See RemoteApp.
- Have an authorization that covers the web asset and the account used to sign in.
Create a web asset
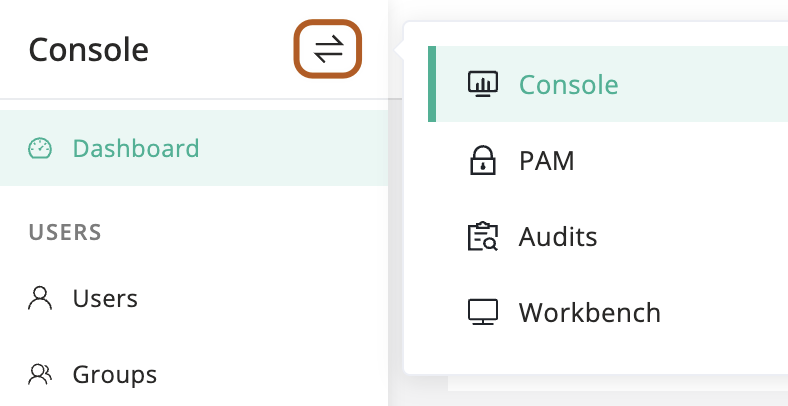
At the top-left of the page, select , then click Console.
Click Create and select the Website platform in the Select platform dialog.
In the Create asset drawer, type a name in the Name field and select one or more nodes in the Nodes field.
In the URL field, type the full website address, including the scheme and
the port when it is not 80 or 443. For example,
https://intranet.example.com:8443.
Optional: in the Allowed sites field, type the full HTTP/HTTPS origins
that users may open, for example https://intranet.example.com:8443. Enter
the scheme, host, and port without a path or a wildcard, and press Enter after
each. Leave the field empty to allow every site; when the field is set,
navigation is limited to the asset address and the listed sites.
Bind the account used to sign in to the site with Add or Add from template.
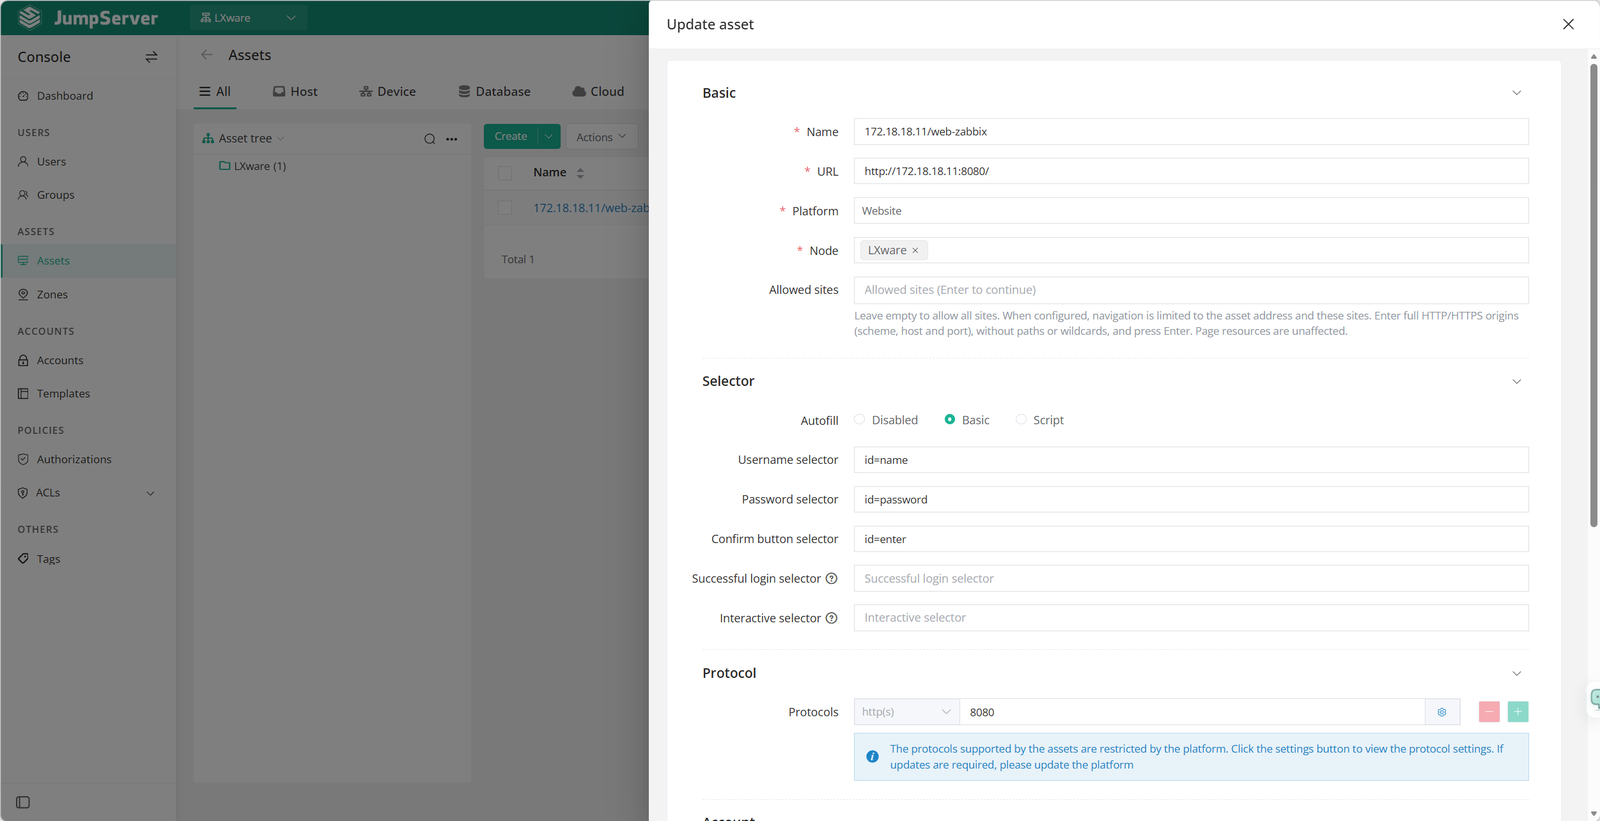
Field reference
Available protocols are defined by the platform. To change protocol capabilities, update the platform instead of the asset.
Connect to a web asset
New in v5.0.0Users open a web asset from JumpServer Client or from the browser Web Terminal. The two paths are separate: the client opens the site in its built-in browser, while the Web Terminal opens a published WebLite application.
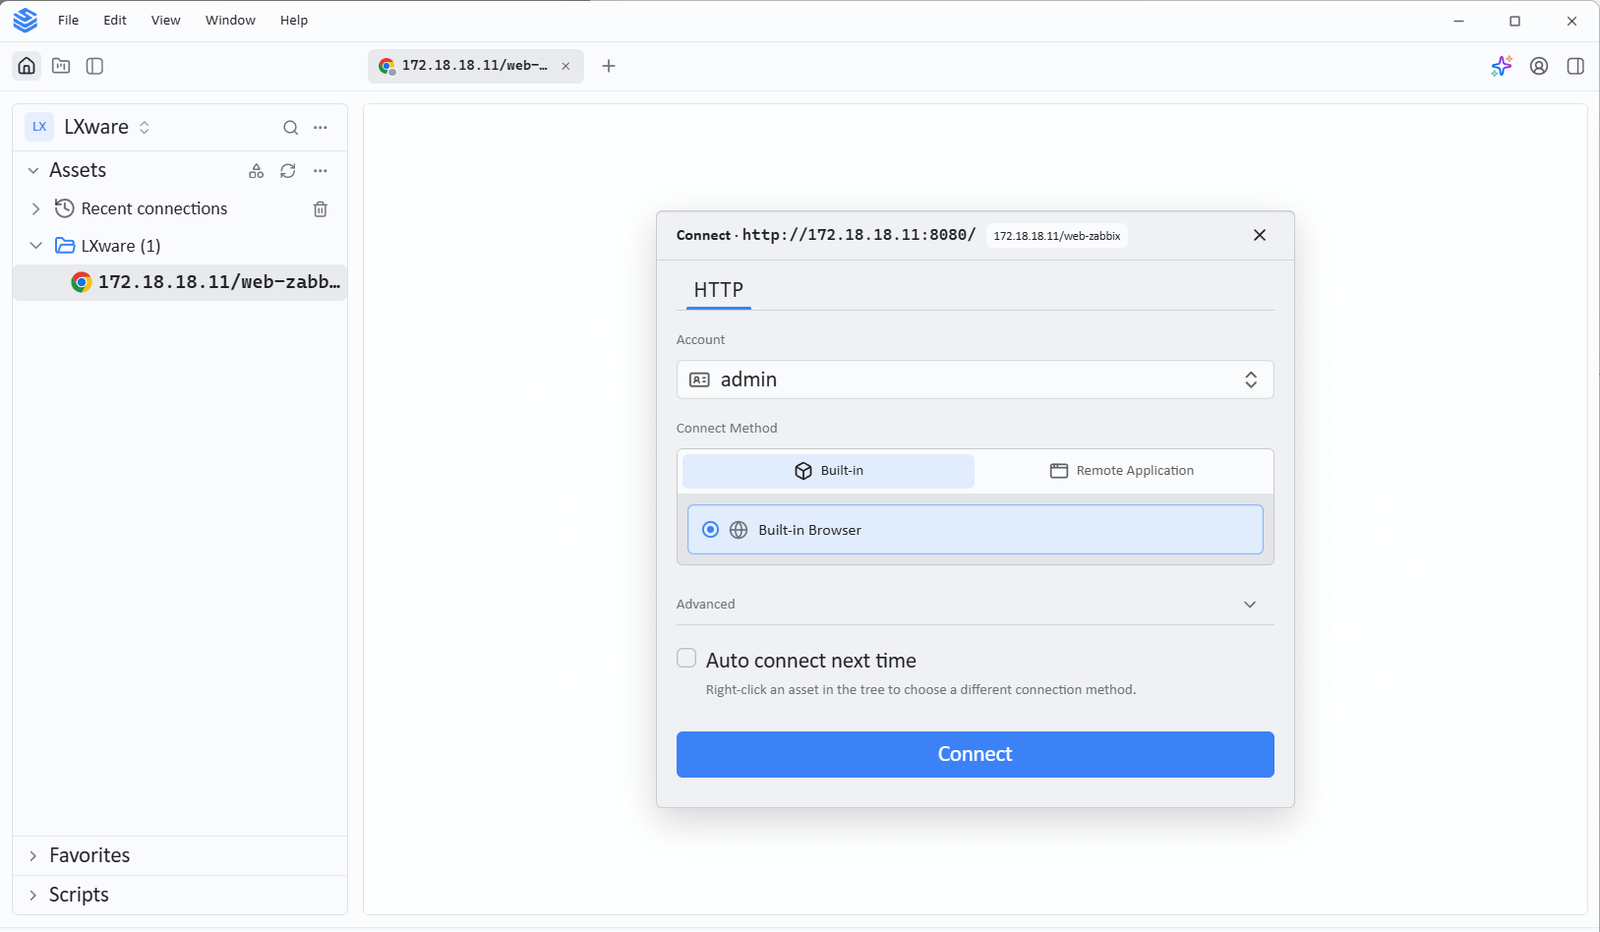
Open in the client built-in browser
The site opens in a WebView window, and traffic is forwarded through the JumpServer Web proxy. The administrator configures the address and the account on the web asset, and the client does not provide an edit entry. Autofill signs the user in with the bound account before the page is shown.
Open in the browser Web Terminal
http or https protocol and an authorized account.Choose the Remote application connection method and select JumpServer WebLite.
The site opens inside the published WebLite application. This path requires a RemoteApp machine or a VirtualApp provider, and the WebLite application must be published on the provider. Without a publisher, the Web Terminal cannot open a web asset; use the client built-in browser instead.
Autofill
Autofill signs the user in to a site that requires authentication. Before the page is shown, JumpServer fills in the username and password of the bound account, so the user does not type or see the credentials. The method is set per asset in the Autofill field.
Whether autofill applies to both access paths or only to the WebLite path is to be confirmed. Bind an account to the asset either way, so the credentials are available when the method runs.
Disabled
Select Disabled for sites that do not require authentication, such as a status page or a firewall login page without an account. The username and password selectors are hidden, and no autofill runs.
Basic
Select Basic when the username field, the password field, and the sign-in button are on the same page. JumpServer fills in the fields and submits the form.
The method uses the selectors below. Supported selector types include Name, ID,
Class, CSS, and XPath; name= and id= are the common forms.
Script
Select Script for sites with a complex sign-in flow, such as multi-step authentication, a page that needs manual verification, or a login flow that moves across pages. Script autofill requires JumpServer Enterprise Edition.
A script is a JSON array of steps. Each element is one step, and step starts at
1 without repeating.
The commands are:
{USERNAME} and {SECRET} are replaced with the username and secret of the
account bound to the asset when the script runs. Use them with the type
command.
The example below types the username and password, clicks the sign-in button,
waits for manual verification, and ends with success.
Remove the interactive step when the site has no manual step, but keep success
as the last step.
The fields and command set above follow the vendor's V5 documentation for Web
assets. The English UI may label individual fields differently, and earlier V4
documentation listed a different command set (click, type, sleep, and
select_frame). Confirm the options in your build before you author a script.
The vendor's V5 documentation states that the current Web Proxy does not support sign-in inside an iframe or in a separate popup window; multi-step scripts must finish in the same window. Confirm the behavior on your deployment before you plan a flow around an embedded login.
Self-signed certificates
Web assets trust self-signed certificates by default, so a site whose certificate is not issued by a public CA still opens in JumpServer. The client accepts the certificate that the site presents.
Because self-signed certificates are trusted by default, review a site before you add it as a web asset, and add only sites that you control or trust. A self-signed certificate does not prove the identity of the server, so an untrusted or spoofed site can also present one.
Recording and audit
Recording of web asset sessions requires JumpServer Enterprise Edition, and the deployment must have recording storage configured. See Storage.
Where a web asset recording is reviewed, which protocol value it shows, and whether replay depends on the Video Worker are to be confirmed.
Troubleshooting
Version history
The v5.0.0 attribution follows the unified connection entry release note. Confirm the exact attribution in the official release notes.